Live Hand Sign Detector for iOS using Core ML and Custom Vision

Core ML is an interesting means to add a pre trained model to your app. But one thing that nagged me after trying my hands on Core ML was that how can I possibly train my own model and integrate in my apps using Core ML. Well, after doing some homework, a lot of light was dawned on me about the brilliant possibilities of achieving this. To be honest majorly all the ways require you to understand and know your math really well! While I was on this roller coaster ride, I came across Custom Vision. What a brilliant relief for developers who are looking at starting right away with training models and manifesting their machine learning ideas into the reality of mobile apps without diving too deep into the waters of machine learning.

Custom Vision
Microsoft’s Custom vision allows you to upload images with tags, train your model for classification of images in these tags and helps you export the trained model in formats preferred by you (we will be primarily focusing on Core ML format in this blog). Along with this, Custom Vision gives you a dashboard of the performance of your trained model gauging it on prediction and recall percentage. You can even test your trained model using their interface.

The free trial lets you create two projects and use them to train your models. We need to buy their services for anything beyond this. It’s a great start to try your hands at self training a machine learning model.

I will walk you through a basic hand sign detector, which recognises ROCK, PAPER, SCISSORS! By that I mean, it recognises a closed fist, an open palm and a victory sign. This can even be taken forward to build a sign language interpreter. So here goes! Bon Voyage!

Create a new Custom Vision Project

  1. Login to Custom Vision or sign up if you don’t have a microsoft account already.
  2. Once you sign in, add a new project and add a name and description to your project.
  3. The next thing you need to select is the project type. Our project type will be classification as we are building our own model. The other option is for a prebuilt object detection custom vision model.
  4. Choosing the classification type is use case dependant. It depends on the number of predictions that will be derived from one input image. For instance, whether you want to input a picture of a person and predict the gender, emotion and age of the person or just the gender of the person. If you wish your model to predict just one thing from one input image then choose – Multiclass (Single tag per image), else choose – Multilabel (Multiple tags per image). We will choose the former for this example.
  5. Finally the domain to be chosen is General (compact), which will gives a compact model suitable for mobile and gives an option to directly export the model as a Core ML model.

Figure 1: Create Project Dialogue Box on Custom Vision

Train your image classifier model
Once the project has been created, you would need a lot of pictures! And by lot, I mean lot! Here’s the deal, for each type of prediction you want your model to make, you need to train it with a bunch of images telling what is called what. It is like training a child to associate a word with anything that the child perceives, but just faster! 😛 For my model I trained it with around 60-70 images of – fist, open palm, victory sign and no hand. Below is list of things I did to train my model:

  1. Collect images! Now, diversity is the key in this activity. I collected images of all three signs in various lightings, various positions on the phone screen with different backgrounds and a lot of different hands. Thanks to all my awesome hand modelling volunteers (a.k.a family and friends)! You could do the same. This is the most fun part of the voyage.
    Here are the snapshots of my memories from the voyage! More about them in the following points.

    This slideshow requires JavaScript.

  2. Each set of images needs to be tagged with a label that will be the output of your model after prediction. So we need to add these tags first. Add your tags with the ‘+’ button near ‘Tags’ label. I added four such tags – FistHand, FiveHand, NoHand, VictoryHand.
  3. Once you are done adding your tags, it is time to upload your images and tag them up! You need to click on Add Images option on the top of the screen. Upload all images belonging to one group together along with the tag for that group.
    Quick Tip: Resize all your images to a smaller dimension so that the model size isn’t too big. Preview app will easily help you do it for all your images at one go.
  4. All image sets have been added and tagged. Now all you need to do, to train your model is press a button! Click the ‘Train’ button on top. The wonderful machine learning engine of Custom Vision by Microsoft, trains a model for you using the images you feed it.
  5. After the engine finishes training your model, it opens the performance tab showing the performance of your model. Here you get to see the overall precision and recall percentage of your model along with precision and recall percentage for each tag. Based on how satisfied you are with your model’s performance, you can further improve it or use the same model. To re-train your model, add a few more variants for each tag to improve your model and hit the ‘Train’ button again.


    Figure 2: Performance Tab on Custom Vision dashboard for trained model

  6. You can test your model by clicking on the Quick Test button next to Train button on the top. Here you can upload new pictures and test your model for classification.

Using your trained model in your iOS app

You have two options at this point when you have a trained model you are satisfied with.

  1. You can either use an endpoint provided by Microsoft to hit it each time with an image and it will send back the prediction, both over the network. To view the endpoint details, go to the ‘Prediction’ tab and hit the ‘View Endpoint’ button. Here you will get all the details of the API endpoint. Works with both image url or actual image file.
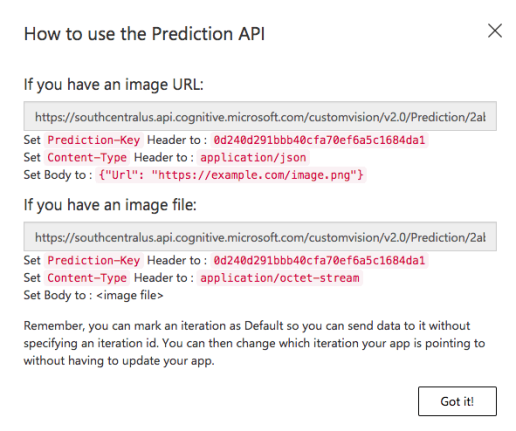
    null                                 Figure 3: Prediction API for trained model
  2. The other, faster and more secure path is the Core ML way. You can export your trained model as a Core ML model. This option is on the Performance Tab. Hit the Export button and then select the export type to be iOS – Core ML. Ta-Da! You have your .mlmodel file ready to be integrated in your iOS project.You will have something that does the following:


Figure 4: Input and ideal output of the HandSigns.mlmodel

Setup a live feed capture from phone camera

In this example, I have a live feed capture being sent to the Core ML model for giving out its prediction. So now we need to have a setup in place which will start the camera and start live capture and feed the buffer to our prediction model. This is a pretty straight forward bit of code that will surely look simple only if you understand what is happening.

  1. For this example, we take a Single Page Application project. It can be any other type depending on your requirements.
  2. Once in the project, let us build a method to configure our camera. This will be called in the viewDidLoad() method. We will do this with the help of AVCaptureSession and thus you will have to import AVKit.
    func configureCamera() {
    //Start capture session
    let captureSession = AVCaptureSession()
    captureSession.sessionPreset = .photo
    captureSession.startRunning()
    // Add input for capture
    guard let captureDevice = AVCaptureDevice.default(for: .video) else { return }
    guard let captureInput = try? AVCaptureDeviceInput(device: captureDevice) else { return }
    captureSession.addInput(captureInput)
    // Add preview layer to our view to display the open camera screen
    let previewLayer = AVCaptureVideoPreviewLayer(session: captureSession)
    view.layer.addSublayer(previewLayer)
    previewLayer.frame = view.frame
    // Add output of capture
    /* Here we set the sample buffer delegate to our viewcontroller whose callback
    will be on a queue named - videoQueue */
    let dataOutput = AVCaptureVideoDataOutput()
    dataOutput.setSampleBufferDelegate(self, queue: DispatchQueue(label: "videoQueue"))
    captureSession.addOutput(dataOutput)
    }
  3. As we are setting the video output buffer delegate to our viewcontroller, it must extend AVCaptureVideoDataOutputSampleBufferDelegate, in order to implement the didOutput sampleBuffer method to catch the sample buffers thrown out from the AVCaptureConnection.
    class ViewController: UIViewController, AVCaptureVideoDataOutputSampleBufferDelegate {
    ...
    ...
    ...
    }
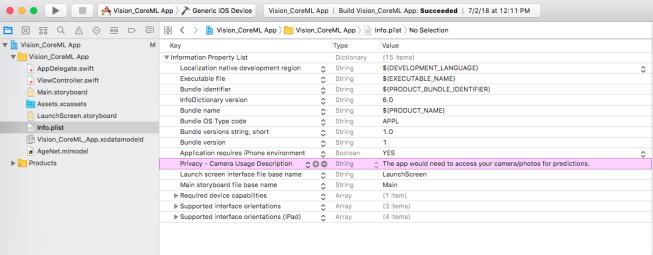
  4. The last thing remaining for this setup is the permission for using camera to be listed in info.plist. Add Privacy Camera Usage Description and add a string value to this key. Something like – App needs camera for detection. Your setup is in place now! Go ahead and try to run it on a device and the app should open up the camera as it launches.


Figure 5: Info.list with Camera Usage Permission


Integrate your Core ML model in your iOS project

The real fun for which you have been taking all these efforts, begins now. As you must know, including coreml model in iOS project is as simple as dragging and dropping it in your project structure in XCode. Once you add your downloaded/exported coreml model, you can very well analyse it by clicking on it and checking the generated swift file for your model. Mine looks like this:

Figure 6: HandSign.mlmodel overview

The steps below will guide you through this:

  1. First things first, import the Vision library and import CoreML for this image classifier example. We will need it while initialising the model and using the core ML functionalities in our app.
    import CoreML
    import Vision
  2. Now we will make an enum for our prediction labels/tags.
    enum HandSign: String {
    case fiveHand = "FiveHand"
    case fistHand = "FistHand"
    case victoryHand = "VictoryHand"
    case noHand = "NoHand"
    }
  3. When our model outputs a result, we reduce it to a string type. You will need some UI component to display it. For that we will add a UILabel in our ViewController through the storyboard file and add the necessary constraints such that it is set at the bottom of the screen.

                                        Figure 7: UILabel for displaying prediction

  4. Draw an outlet of the UILabel in your viewController. I have named it predicitonLabel. 
  5. Once we have all of that in place, we can begin with the initialisation of our core ML model – HandSignsModel.mlmodel and extract the sample buffer input from AVCaptureConnection and feed it as an input to our hand sign detector model. We will then utilise the output of its prediction. To do so we will implement the didOutput sampleBuffer method of AVCaptureVideoDataOutputSampleBufferDelegate. Detailed step wise explanation of everything happening in this method is put up in the code comments inline. Seemed liked the best way to put it up.
    // MARK: - AVCaptureVideoDataOutputSampleBufferDelegate
    /* This delegate is fired periodically every time a new video frame is written.
    It is called on the dispatch queue specified while setting up the capture session.
    */
    func captureOutput(_ output: AVCaptureOutput, didOutput sampleBuffer: CMSampleBuffer, from connection: AVCaptureConnection) {
    /* Initialise CVPixelBuffer from sample buffer
    CVPixelBuffer is the input type we will feed our coremlmodel .
    */
    guard let pixelBuffer: CVPixelBuffer = CMSampleBufferGetImageBuffer(sampleBuffer) else { return }
    /* Initialise Core ML model
    We create a model container to be used with VNCoreMLRequest based on our HandSigns Core ML model.
    */
    guard let handSignsModel = try? VNCoreMLModel(for: HandSigns().model) else { return }
    /* Create a Core ML Vision request
    The completion block will execute when the request finishes execution and fetches a response.
    */
    let request = VNCoreMLRequest(model: handSignsModel) { (finishedRequest, err) in
    /* Dealing with the result of the Core ML Vision request
    The request's result is an array of VNClassificationObservation object which holds
    identifier - The prediction tag we had defined in our Custom Vision model - FiveHand, FistHand, VictoryHand, NoHand
    confidence - The confidence on the prediction made by the model on a scale of 0 to 1
    */
    guard let results = finishedRequest.results as? [VNClassificationObservation] else { return }
    /* Results array holds predictions iwth decreasing level of confidence.
    Thus we choose the first one with highest confidence. */
    guard let firstResult = results.first else { return }
    var predictionString = ""
    /* Depending on the identifier we set the UILabel text with it's confidence.
    We update UI on the main queue. */
    DispatchQueue.main.async {
    switch firstResult.identifier {
    case HandSign.fistHand.rawValue:
    predictionString = "Fist👊🏽"
    case HandSign.victoryHand.rawValue:
    predictionString = "Victory✌🏽"
    case HandSign.fiveHand.rawValue:
    predictionString = "High Five🖐🏽"
    case HandSign.noHand.rawValue:
    predictionString = "No Hand ❎"
    default:
    break
    }
    self.predictionLabel.text = predictionString + "(\(firstResult.confidence))"
    }
    }
    /* Perform the above request using Vision Image Request Handler
    We input our CVPixelbuffer to this handler along with the request declared above.
    */
    try? VNImageRequestHandler(cvPixelBuffer: pixelBuffer, options: [:]).perform([request])
    }
    }

Congratulations, you have built your very own machine learning model and integrated the same in an iOS app. You can find the entire project with the model and implementation here.

Here is a working demo of the app we have referred to through this tutorial:
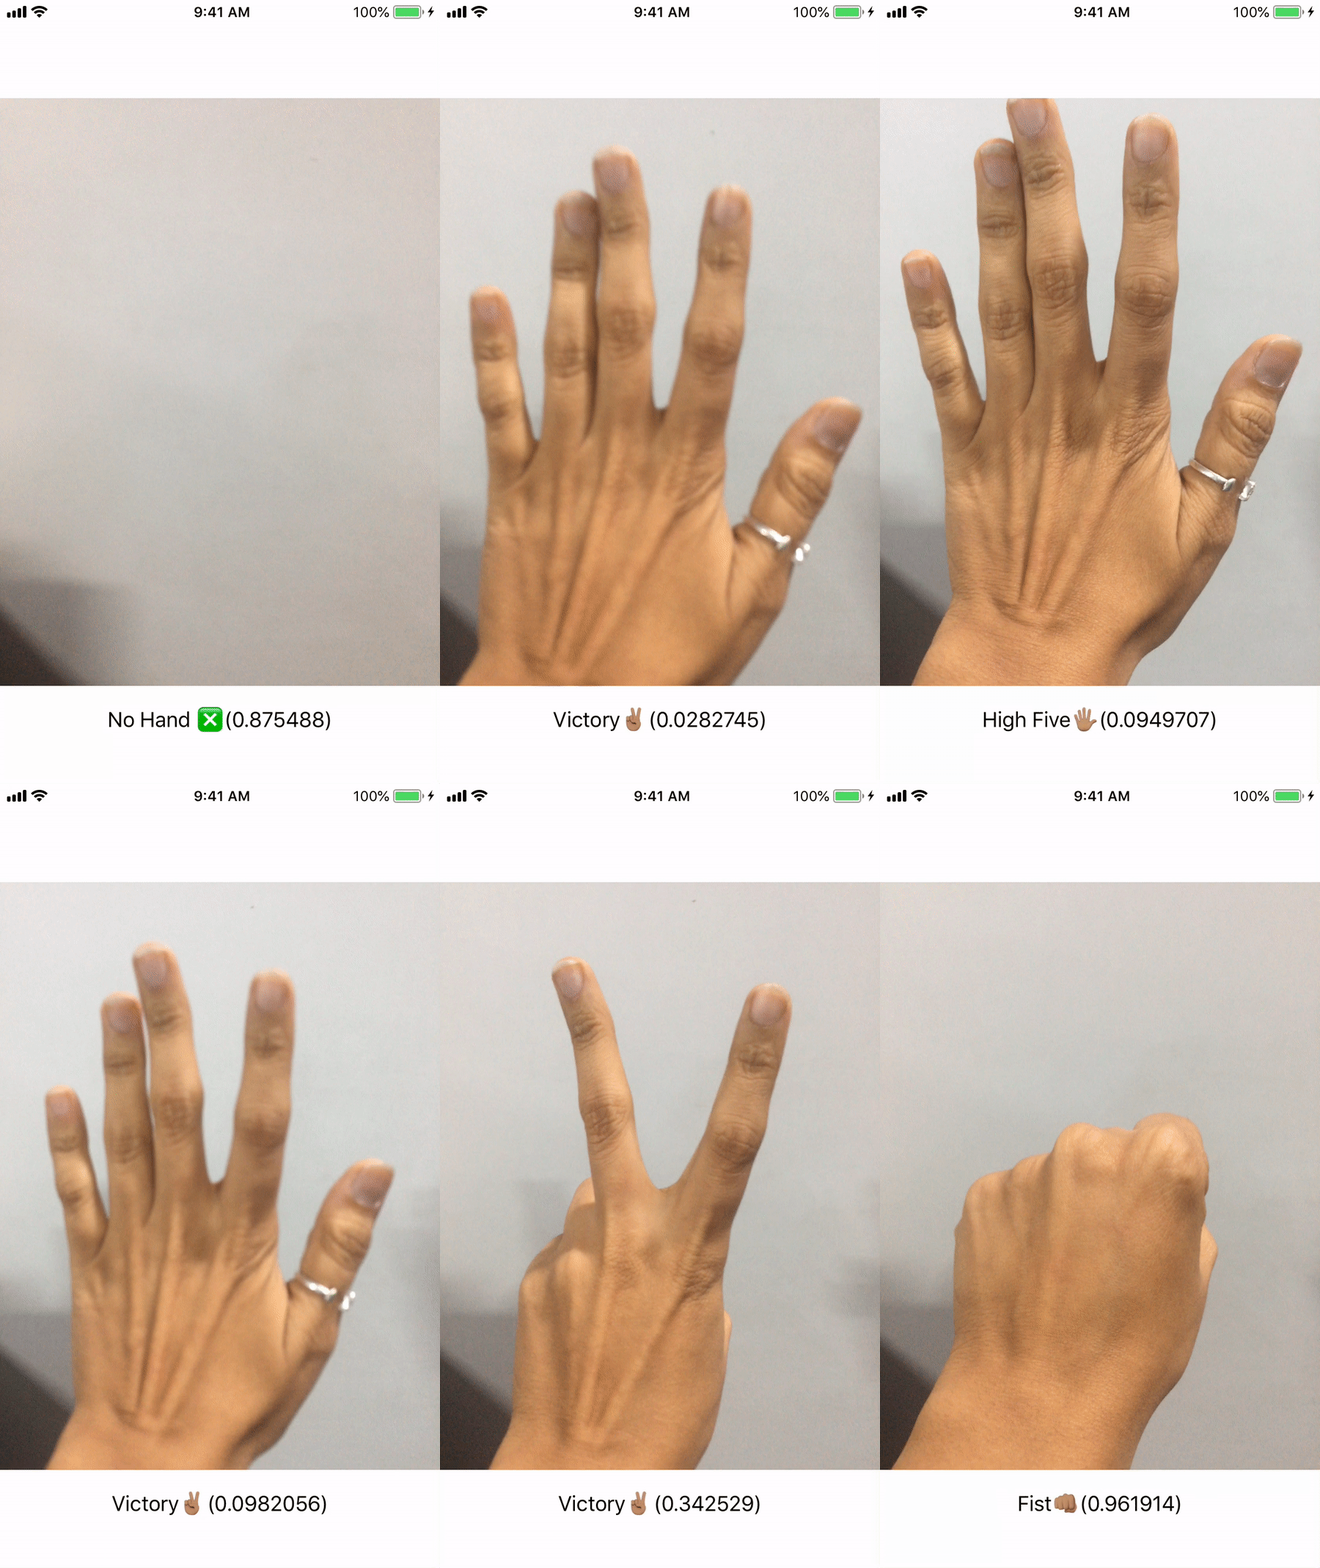
ezgif.com-video-to-gif

Core ML with Vision Tutorial

I stumbled upon a lot of tutorials while looking for trying my hands at Core ML framework by Apple. After having tried a few, I came up with my very own 😛 It is good exercise! So here you go.

Pre requisites:

1. MacOS (Sierra 10.12 or above)
2. Xcode 9 or above
3. Device with iOS 11 or above. Good news – The app can run on a simulator as well!

Now follow the steps below to start your Core ML quest:

  1. To begin with, create a new XCode project – Single Page Application and name it anything under the sun. 😛
  2. Now we need a setup to click photos or pick photos from library to feed the model as an input for age prediction. Instead of giving you a link to a readymade setup, I’ll quickly walk you through the setup. Disclaimer: Pictures will speak louder than my words for this setup.
    1. Let’s start with the UI. Jump to your Main.storyboard. On your current view, drag the following components.
      1. Drag 2 UIButton: Camera and Photos – These will help you input an image either with phone camera or photos library respectively
      2. UIImage – This will display your input image
      3. UILabel – This will display the predicted age
    2. Now quickly add constraints to each item on your view. See the pictures below for constraint setting.
    3. Now click on your assistant editor and draw outlets as follows:
      1. IBAction outlet for each UIbutton
      2. UIImage outlet for the our image view
      3. UILabel outlet for the label.
    4. The following code will go in the IBAction outlets for Photos and Camera Button:

      For photos button:

       @IBAction func photosButtonTapped(_ sender: Any) {
          guard UIImagePickerController.isSourceTypeAvailable(.photoLibrary) else {
              let alert = UIAlertController(title: "No photos", message: "This device does not support photos.", preferredStyle: .alert)
              let ok = UIAlertAction(title: "OK", style: .cancel, handler: nil)
              alert.addAction(ok)
              self.present(alert, animated: true, completion: nil)
              return
          }
      
          let picker = UIImagePickerController()
          picker.delegate = self
          picker.sourceType = .photoLibrary
          present(picker, animated: true, completion: nil)
       }

      For camera button:

      @IBAction func cameraButtonTapped(_ sender: Any) {
          guard UIImagePickerController.isSourceTypeAvailable(.camera) else {
              let alert = UIAlertController(title: "No camera", message: "This device does not support camera.", preferredStyle: .alert)
              let ok = UIAlertAction(title: "OK", style: .cancel, handler: nil)
              alert.addAction(ok)
              self.present(alert, animated: true, completion: nil)
              return
           }
           let picker = UIImagePickerController()
           picker.delegate = self
           picker.sourceType = .camera
           picker.cameraCaptureMode = .photo
           present(picker, animated: true, completion: nil)
       }

      Here as we are using the UIImagePickerController() we need to extend our class with UINavigationControllerDelegate and UIImagePickerControllerDelegate.

      class ViewController: UIViewController, UINavigationControllerDelegate, UIImagePickerControllerDelegate {
          ...
          ...
      }
    5. Now, we need to use the didFinishPickingMediaWithInfo delegate method to set the image picked from camera or photos library to the image view on our UI. Use the following code for the same.
      func imagePickerController(_ picker: UIImagePickerController, didFinishPickingMediaWithInfo info: [String : Any]) {
          dismiss(animated: true)
          guard let image = info[UIImagePickerControllerOriginalImage] as? UIImage else {
              fatalError("couldn't load image")
          }
         // Set the picked image to the UIImageView - imageView
         imageView.image = image
       }
    6. Now move to Info.plist and add a KeyPrivacy – Camera Usage Description and add ValueThe app would need to access your camera/photos for predictions.

    Congratulations! You have completed the initial setup. Now run your app and you should have an app that lets you take pictures from the phone camera or from the photos library of the device and it is displayed in the image view on the screen.

    Note: The camera functionality won’t work on a simulator. But you can use the image picker to pick images from photos library.

  3. Once the setup is done, we need a core ml model to be added to our system. We are using AgeNet for this app. You can download it from here.
  4. Once you have downloaded the model, you need to add it to your project. All hail drag and drop! Drag and drop the downloaded model into the xcode project structure.
  5. Now analyse (read as ‘click on’) this model to see the input and output parameters.
  6. Additionally you can click the arrow to open the model class which is automagically generated by xcode for our core ml model.

  7. Now we need to give the expected input to the model to get the expected prediction as output from the model. For this you will have to import CoreML and Vision frameworks in your ViewController.Swift
    Add import statements at the top as follows:

    import CoreML
    import Vision

    Now add a detectAge() function in the file:

    func detectAge(image: CIImage) {
             predictionLabel.text = "Detecting age..."
             // Load the ML model through its generated class
             guard let model = try? VNCoreMLModel(for: AgeNet().model) else {
                  fatalError("can't load AgeNet model")
             }
             // Create request for Vision Core ML model created
             let request = VNCoreMLRequest(model: model) { [weak self] request, error in
                 guard let results = request.results as? [VNClassificationObservation], let topResult = results.first else {
                       fatalError("unexpected result type from VNCoreMLRequest")
                 }
    
                 // Update UI on main queue
                 DispatchQueue.main.async { [weak self] in
                       self?.predictionLabel.text = "I think your age is \(topResult.identifier) years!"
                 }
            }
    
            // Run the Core ML AgeNet classifier on global dispatch queue
            let handler = VNImageRequestHandler(ciImage: image)
                  DispatchQueue.global(qos: .userInteractive).async {
                  do {
                      try handler.perform([request])
                  } catch {
                      print(error)
                  }
            }
    }
  8. So far so good! Now the one last thing that you need to do is call this detectAge() function. We need to call detectAge() when our image pickers finish picking the images from camera or photos gallery. So add the method call in didFinishPickingMediaWithInfo delegate method added earlier. The delegate method should like this now:
    func imagePickerController(_ picker: UIImagePickerController, didFinishPickingMediaWithInfo info: [String : Any]) {
         dismiss(animated: true)
         guard let image = info[UIImagePickerControllerOriginalImage] as? UIImage else {
         fatalError("couldn't load image")
         }
         // Set the picked image to the UIImageView - imageView
         imageView.image = image
    
        // Convert UIImage to CIImage to pass to the image request handler
        guard let ciImage = CIImage(image: image) else {
            fatalError("couldn't convert UIImage to CIImage")
        }
        detectAge(image: ciImage)
    }

    You are good to go now. Run the project and get ready to detect the ages of people around you. You can use the camera or select photos from photos library.

You can find the entire project here.

XLPagerTabStrip integration in Swift Project

XLPagerTabStrip is a very neat plugin developed by xmartlabs for implementing the pager tab view in iOS using Swift. This tutorial will take you through the steps needed to integrate this wonderful plugin in your existing Swift project.

First things first, you will have to add XLPagerTabStrip to your project using CocoaPods or Carthage.

XLPagerTabStrip pod install using Cocoapods

  1. Open terminal
  2. If cocoapods is not already installed, install it with following gem command.
    $ sudo gem install cocoapods
  3. Now, in the terminal, move to the root folder of your swift project.
    $ cd path/to/project/folder/
  4. Initialise pods for your project. This step will create a podfile for your project.
    $ pod init

  5. Figure 1. Initialising pod for the project

  6. Go to your project folder from Finder and open the PodFile using any editor.

  7. Figure 2. Project structure with PodFile

  8. Add the following line to the podfile, save and close it.
    pod 'XLPagerTabStrip', '~> 8.0'

  9. Figure 3. Edited PodFile for XLPagerTabStrip installation

  10. Now we need to install the pod we just added to the PodFile. To do so, go to the terminal and type the following.
    $ pod install

  11. Figure 4. XLPagerTabStrip pod installation using terminal

  12. On visiting the project folder again, you will notice that a workspace would have been created for the project. Open this xcworkspace and from now on you will work in this workspace itself.

  13. Figure 5. Project structure after pod installation

  14. If there are issues identifying the XLPagerTabStrip module, quit xcode, reopen your project workspace, clean and build your project again. Your project structure should look something like this :

  15. Figure 6. Project folder structure in Xcode after opening project workspace

XLPagerTabStrip integration in xcode project workspace

Now as other things are in place, let’s begin the integration of our pager strip in the xcode project workspace we just opened. Below steps will guide you through it.

  1. Open the ViewController and import XLPagerTabStrip module.
  2. Extend this controller to ButtonBarPagerTabStripViewController.

  3. Figure 7. XLPagerTabStrip module import

  4. In Main.storyboard, drag and drop a View Controller and attach it to your ViewController.
  5. Add a Collection View at the top, add the required constraints to it and update its class to ButtonBarView

  6. Figure 8. Collection view with constraints and class name update

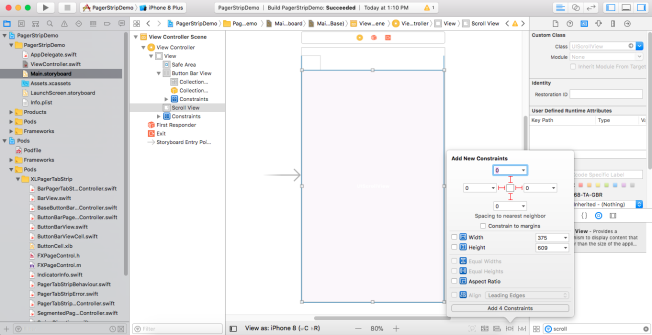
  7. Add a Scroll View below the collection view and add the required constraints.

  8. Figure 9. Scroll view with required constraints

  9. Let’s add another UIViewController to the project and name it ChildViewController. This view controller will hold the view to be shown on each tab of the pager strip tabbar. Depending on your requirements, you can add multiple such view controllers or utilise one view controller with multiple instances. If each tab holds completely different components then go for multiple such view controllers else if both have similar components, one view controller should suffice.

  10. Figure 10. Addition of ChildViewController to the project

  11. Drag and drop one View Controller onto the Main.storyboard and attach your ChildViewController to this View Controller on the storyboard.
  12. Drag and drop a UILabel on this child view controller in the storyboard. This label will show the number of the child, which will be passed from ViewController.

  13. Figure 11. Addition of ChildViewController with UILabel on storyboard

  14. Now open ChildViewController class and import XLPagerTabStrip in it. Then extend this class to – IndicatorInfoProvider. This will be required to add title of the pager strip tabs. Add the following function to do so.
    func indicatorInfo(for pagerTabStripController: PagerTabStripViewController) -> IndicatorInfo {
         return IndicatorInfo(title: "\(childNumber)")
    }
    

  15. Figure 12. ChildViewController with IndicatorInfo for pager tab strip

  16. Add the following code to ViewController to return the child view controllers of the pager strip. Here we pass two instances of ChildViewController and thus two tabs will be shown and both will load the ChildViewController with different childNumber. Refer the code below.
    // MARK: - PagerTabStripDataSource
    
    override func viewControllers(for pagerTabStripController: PagerTabStripViewController) -> [UIViewController] {
    
         let child1 = UIStoryboard.init(name: "Main", bundle: nil).instantiateViewController(withIdentifier: "ChildViewController") as! ChildViewController
         child1.childNumber = "One"
    
         let child2 = UIStoryboard.init(name: "Main", bundle: nil).instantiateViewController(withIdentifier: "ChildViewController") as! ChildViewController
         child2.childNumber = "Two"
    
         return [child1, child2]
    }
    
  17. Run the project now. You should get something like this:

  18. Figure 13. Pager tab strip after initial run

Customising the look for a neat UI

  1. In Main.storyboard, embed ViewController inside any view controller of your choice to customise further. I have embedded it inside Navigation Controller for simplicity. To do this, select the view controller you want to embed in navigation controller and go to
    Editor -> Embed In -> Navigation Controller

  2. Figure 14. ViewController Embedded in Navigation Controller

  3. Add customisations for the CollectionView by adding the following code to ViewController and make sure all these settings are done before calling super.viewDidLoad(). Refer to the screenshot below the code.
    // MARK: - Configuration
    
    func configureButtonBar() {
         // Sets the background colour of the pager strip and the pager strip item
         settings.style.buttonBarBackgroundColor = .white
         settings.style.buttonBarItemBackgroundColor = .white
    
         // Sets the pager strip item font and font color
         settings.style.buttonBarItemFont = UIFont(name: "Helvetica", size: 16.0)!
         settings.style.buttonBarItemTitleColor = .gray
    
         // Sets the pager strip item offsets
         settings.style.buttonBarMinimumLineSpacing = 0
         settings.style.buttonBarItemsShouldFillAvailableWidth = true
         settings.style.buttonBarLeftContentInset = 0
         settings.style.buttonBarRightContentInset = 0
    
         // Sets the height and colour of the slider bar of the selected pager tab
         settings.style.selectedBarHeight = 3.0
         settings.style.selectedBarBackgroundColor = .orange
    
         // Changing item text color on swipe
         changeCurrentIndexProgressive = { [weak self] (oldCell: ButtonBarViewCell?, newCell: ButtonBarViewCell?, progressPercentage: CGFloat, changeCurrentIndex: Bool, animated: Bool) -> Void in
               guard changeCurrentIndex == true else { return }
               oldCell?.label.textColor = .gray
               newCell?.label.textColor = .orange
         }
    }
    

  4. Figure 15. Customisations in ViewController

  5. Run the project again. You should get something like this:

  6. Figure 16. Pager tab strip after basic customisations

Codebase
You can also find the above codebase here

References
[1] Source code for XLPagerTabStrip: https://github.com/xmartlabs/XLPagerTabStrip

SonarQube Integration for Swift

If you have landed up here, I assume you have already made your choice of picking SonarQube as your code analysis tool. And what a choice I must say! Nevertheless, to strengthen your faith in SonarQube even further, here are some key code quality check points provided by SonarQube, which make it a desirable essential of a swift project:

  • Architecture & Design
  • Complexity
  • Duplications
  • Coding Rules
  • Potential Bugs
  • Unit Tests

SonarQube addresses not just bugs but also the above six axes of quality which are neatly projected on a dashboard.

For more insights, visit https://www.sonarqube.org/ if you haven’t already!

We are going to bring the awesomeness of SonarQube in our swift projects with the help of a plugin called sonar-swift. Sonar-swift is an open source initiative for Swift language support in SonarQube and its structure is based on the sonar-objective-c plugin [2].

We are going to try our hand at integrating this with a swift project through this blog.

So brace yourselves, or not, because it is way simpler than it seems! Let’s go.

PREREQUISITES

  1. A Mac with Xcode 7 or +
  2. JDK
  3. A swift project for code analysis
  4. Swift project should have a test target. Even if it is empty and has no tests.
    Add Target -> iOS Unit Testing Target -> Scheme setup -> Done

SETUP

If the above prerequisites are in place, we can begin our adventure with the following guide:

1. SonarQube server setup

Before integrating SonarQube in our Swift project, we need to make sure our SonarQube server is up and running locally. Follow the below steps for this [3] :

a. Download and unzip the sonar distribution from here.

NOTE: Make sure your unzipped folder is in the same path as your swift project.

b. Open terminal and run the following command to start the Sonar server:
/path/to/sonar/distribution/directory/bin/macosx-universal-64/sonar.sh start

NOTE: To give execute permissions to the above script, open Terminal and type chmod 755 /path/to/script . Instead of typing the full path, you can drag the script onto the Terminal window from Finder. Once this is done, you will be able to execute the script.

c. Log in to http://localhost:9000 with System Administrator credentials (admin/admin) and generate a project key for your first project. You can give any name you like.

ACHIEVEMENT: Sonar server is up and running and you can now move forward with the setup.

2. SonarQube Scanner download

      1. Download the SonarQube Scanner for Mac OS X 64 bit from the here. [4]
      2. Expand the downloaded file into the directory where you added your sonar distribution folder. Let’s call it – install directory
      3. Update the global settings to point to your SonarQube server by editing /path/to/install/directory/conf/sonar-scanner.properties:

        #—– Default SonarQube server
        #sonar.host.url=http://localhost:9000

        NOTE: You can open the .properties file using xcode itself.

      4. Add the /path/to/install/directory/bin directory to your system paths. To do that, open a new Terminal window and type the following [5] :
        1. sudo nano /etc/paths
        2. Enter your password, when prompted.
        3. Go to the bottom of the file, and enter the path you wish to add.
        4. Hit control-x to quit.
        5. Enter “Y” to save the paths.
      5. You can verify your installation by opening a new terminal window and executing the command sonar-scanner -h. You should get the help menu for sonar-scanner.

ACHIEVEMENT: Sonar-scanner setup successfully done. Now you have an engine which will scan your code for the quality check.

3. Xcpretty installation

Open a new terminal and do the following to install xcpretty with a required fix [2]:

      1. git clone https://github.com/Backelite/xcpretty.git
      2. cd xcpretty
      3. git checkout fix/duration_of_failed_tests_workaround
      4. gem build xcpretty.gemspec
      5. sudo gem install –both xcpretty-0.2.2.gem

ACHIEVEMENT: You have just made a provision to have a meaningful output for your build because xcpretty is a tool designed to format xcodebuild’s output, and make it human readable.

4. Install SwiftLint – Version 0.3.0 or above

SwiftLint is a tool supported by the team of Realm.io to lint your Swift code, verifying that it conforms to a set of rules syntactic rules defined by you [7]. Run the following command in Terminal to install swift lint.

brew install swiftlint

NOTE: If homebrew is not already installed. Do the following to install homebrew:

ruby -e “$(curl -fsSL https://raw.githubusercontent.com/Homebrew/install/master/install)”

5. Install Tailor – Version 0.11.1 or above

Tailor is a static analysis and lint tool for source code written in Swift programming language which analyzes your code to ensure consistent styling and help avoid bugs [8]. Run the following command to install tailor.

brew install tailor

6. Install slather – Version 2.1.0 or above (2.4 since Xcode 8.3)

Slather is a great Ruby tool that can convert gcc coverage data to various other formats which helps generate test coverage reports for Xcode projects [9]. To install slather, run the following command in Terminal.

gem install slather

7. Install lizard

Lizard is an extensible Cyclomatic Complexity Analyzer for many imperative programming languages including Swift [10]. To install lizard, run the following command in Terminal.

sudo pip install lizard

NOTE: To install pip run the following:

sudo easy_install pip

8. Add support for Swift in Sonar

      1. Download the latest Swift plugin from here.
      2. Then, move the .jar to the plugins folder where the SonarQube distribution server has been installed – /path/to/sonar/distribution/folder/extensions/plugins.

ACHIEVEMENT: You have successfully added the sonar-swift plugin in your sonar distribution.

9. Add the Swift Sonar script to your swift project

Add run-sonar-swift.sh in your swift project path. It can be downloaded from here.

10. Restart Sonar Server

Now restart the Sonar server in order to apply the plugin and enable support for Swift. Run the following in Terminal to do so:

/path/to/sonar/distribution/folder/bin/macosx-universal-64/sonar.sh restart

ACHIEVEMENT: We are done with the server setup part. But we still need to configure our project to gather data to feed Sonar for analysis.

11. Configure your Swift project

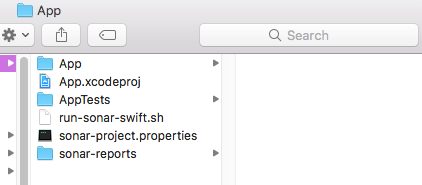
Download and add sonar-project.properties file beside the .xcodeproj file, in your Xcode project root folder. It can be downloaded from here.

NOTE: To directly download individual files from GitHub repo [6] :

      1. Click the file name in a GitHub repo.
      2. Click Raw to display the file contents.
      3. Copy the URL in your browser.
      4. Open terminal and run: curl -LJO https://URL/from/stepc/

12. Update properties file

Open the above file in xcode and update this file to configure it as per your Swift project by setting keys such as sonar.projectKey, sonar.projectName, sonar.sources, sonar.swift.workspace, sonar.swift.appScheme, etc. Basically fill all the required settings. Refer the below screenshot of a sonar-project.properties file.

Figure 1: Screenshot of a sonar-project.properties file

13. Start your code analysis

Time to run our script run-sonar-swift.sh and see the analysis in motion.

        1. Open terminal and cd to the swift project folder
        2. /path/to/run-sonar-swift.sh/
        3. Hit enter
        4. The analysis will begin

ACHIEVEMENT: Once the analysis is complete, it will create a folder called sonar-reports in the project directory where the code analysis reports will be stored.

Screen Shot 2018-04-02 at 10.03.52 PM

Figure 2: Screenshot of Swift project folder structure

14. Dashboard Analysis

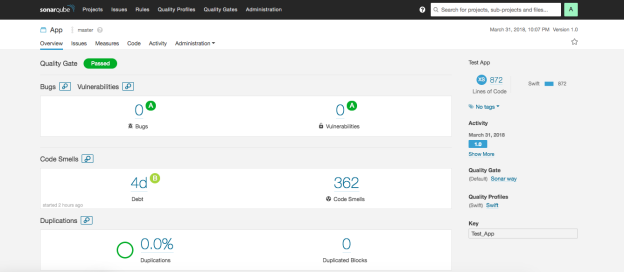
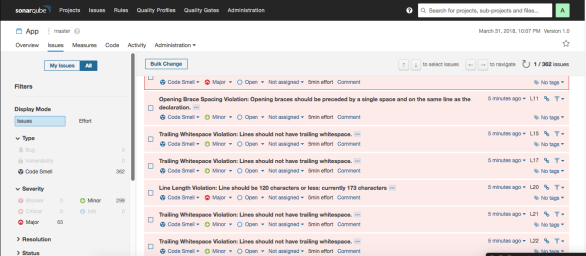
Open localhost:9000 in your browser to see the SonarQube code analysis results on the dashboard. The following screenshots of the dashboard screen show an overview of the quality axes and quality gate result for the project, a graphical analysis of various parameters like security, maintainability, reliability of the code and a list of issues as per their severity level.

null2

Figure 3: Screenshot of the overview of the quality axes of the project – App