
I stumbled upon a lot of tutorials while looking for trying my hands at Core ML framework by Apple. After having tried a few, I came up with my very own 😛 It is good exercise! So here you go.
Pre requisites:
1. MacOS (Sierra 10.12 or above)
2. Xcode 9 or above
3. Device with iOS 11 or above. Good news – The app can run on a simulator as well!
Now follow the steps below to start your Core ML quest:
- To begin with, create a new XCode project – Single Page Application and name it anything under the sun. 😛
- Now we need a setup to click photos or pick photos from library to feed the model as an input for age prediction. Instead of giving you a link to a readymade setup, I’ll quickly walk you through the setup. Disclaimer: Pictures will speak louder than my words for this setup.
- Let’s start with the UI. Jump to your Main.storyboard. On your current view, drag the following components.
- Drag 2 UIButton: Camera and Photos – These will help you input an image either with phone camera or photos library respectively
- UIImage – This will display your input image
- UILabel – This will display the predicted age
- Now quickly add constraints to each item on your view. See the pictures below for constraint setting.
- Now click on your assistant editor and draw outlets as follows:
- IBAction outlet for each UIbutton
- UIImage outlet for the our image view
- UILabel outlet for the label.
- The following code will go in the IBAction outlets for Photos and Camera Button:
For photos button:@IBAction func photosButtonTapped(_ sender: Any) { guard UIImagePickerController.isSourceTypeAvailable(.photoLibrary) else { let alert = UIAlertController(title: "No photos", message: "This device does not support photos.", preferredStyle: .alert) let ok = UIAlertAction(title: "OK", style: .cancel, handler: nil) alert.addAction(ok) self.present(alert, animated: true, completion: nil) return } let picker = UIImagePickerController() picker.delegate = self picker.sourceType = .photoLibrary present(picker, animated: true, completion: nil) }For camera button:
@IBAction func cameraButtonTapped(_ sender: Any) {
    guard UIImagePickerController.isSourceTypeAvailable(.camera) else {
        let alert = UIAlertController(title: "No camera", message: "This device does not support camera.", preferredStyle: .alert)
        let ok = UIAlertAction(title: "OK", style: .cancel, handler: nil)
        alert.addAction(ok)
        self.present(alert, animated: true, completion: nil)
        return
     }
     let picker = UIImagePickerController()
     picker.delegate = self
     picker.sourceType = .camera
     picker.cameraCaptureMode = .photo
     present(picker, animated: true, completion: nil)
 }
Here as we are using the UIImagePickerController() we need to extend our class with UINavigationControllerDelegate and UIImagePickerControllerDelegate.
class ViewController: UIViewController, UINavigationControllerDelegate, UIImagePickerControllerDelegate { ... ... } - Now, we need to use the didFinishPickingMediaWithInfo delegate method to set the image picked from camera or photos library to the image view on our UI. Use the following code for the same.
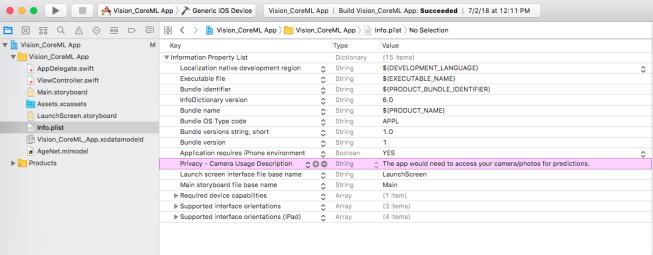
func imagePickerController(_ picker: UIImagePickerController, didFinishPickingMediaWithInfo info: [String : Any]) { dismiss(animated: true) guard let image = info[UIImagePickerControllerOriginalImage] as? UIImage else { fatalError("couldn't load image") } // Set the picked image to the UIImageView - imageView imageView.image = image } - Now move to Info.plist and add a Key – Privacy – Camera Usage Description and add Value – The app would need to access your camera/photos for predictions.


Congratulations! You have completed the initial setup. Now run your app and you should have an app that lets you take pictures from the phone camera or from the photos library of the device and it is displayed in the image view on the screen.
Note: The camera functionality won’t work on a simulator. But you can use the image picker to pick images from photos library.
- Let’s start with the UI. Jump to your Main.storyboard. On your current view, drag the following components.
- Once the setup is done, we need a core ml model to be added to our system. We are using AgeNet for this app. You can download it from here.
- Once you have downloaded the model, you need to add it to your project. All hail drag and drop! Drag and drop the downloaded model into the xcode project structure.
- Now analyse (read as ‘click on’) this model to see the input and output parameters.
- Now we need to give the expected input to the model to get the expected prediction as output from the model. For this you will have to import CoreML and Vision frameworks in your ViewController.Swift
Add import statements at the top as follows:import CoreML import Vision
Now add a detectAge() function in the file:
func detectAge(image: CIImage) { predictionLabel.text = "Detecting age..." // Load the ML model through its generated class guard let model = try? VNCoreMLModel(for: AgeNet().model) else { fatalError("can't load AgeNet model") } // Create request for Vision Core ML model created let request = VNCoreMLRequest(model: model) { [weak self] request, error in guard let results = request.results as? [VNClassificationObservation], let topResult = results.first else { fatalError("unexpected result type from VNCoreMLRequest") } // Update UI on main queue DispatchQueue.main.async { [weak self] in self?.predictionLabel.text = "I think your age is \(topResult.identifier) years!" } } // Run the Core ML AgeNet classifier on global dispatch queue let handler = VNImageRequestHandler(ciImage: image) DispatchQueue.global(qos: .userInteractive).async { do { try handler.perform([request]) } catch { print(error) } } } - So far so good! Now the one last thing that you need to do is call this detectAge() function. We need to call detectAge() when our image pickers finish picking the images from camera or photos gallery. So add the method call in didFinishPickingMediaWithInfo delegate method added earlier. The delegate method should like this now:
func imagePickerController(_ picker: UIImagePickerController, didFinishPickingMediaWithInfo info: [String : Any]) {
     dismiss(animated: true)
     guard let image = info[UIImagePickerControllerOriginalImage] as? UIImage else {
     fatalError("couldn't load image")
     }
     // Set the picked image to the UIImageView - imageView
     imageView.image = image

    // Convert UIImage to CIImage to pass to the image request handler
    guard let ciImage = CIImage(image: image) else {
        fatalError("couldn't convert UIImage to CIImage")
    }
    detectAge(image: ciImage)
}
You are good to go now. Run the project and get ready to detect the ages of people around you. You can use the camera or select photos from photos library.


Additionally you can click the arrow to open the model class which is automagically generated by xcode for our core ml model.

You can find the entire project here.
